Moving from an Android device to an iPhone can seem like a daunting task, but Apple has made the process relatively straightforward. Here’s a step-by-step guide to help you smoothly transition from Android to iPhone:
Before you begin:
- Backup your Android device: Make sure you have backed up all your important data, including contacts, photos, videos, messages, and any other essential files. You can use Google’s built-in backup services or third-party apps for this.
- Ensure your Android device is up-to-date: Update your Android device to the latest version of its operating system to avoid any compatibility issues during the transfer.
- Prepare your iPhone: Ensure your iPhone is charged and turned on. If you haven’t set up your iPhone yet, follow the on-screen instructions until you reach the home screen.
Step 1: Download “Move to iOS” on your Android device:
- On your Android device, open the Google Play Store.
- Search for “Move to iOS” and download the official app developed by Apple.
- Install the app on your Android device.
Step 2: Start the setup process on your iPhone:
- Turn on your new iPhone if you haven’t already.
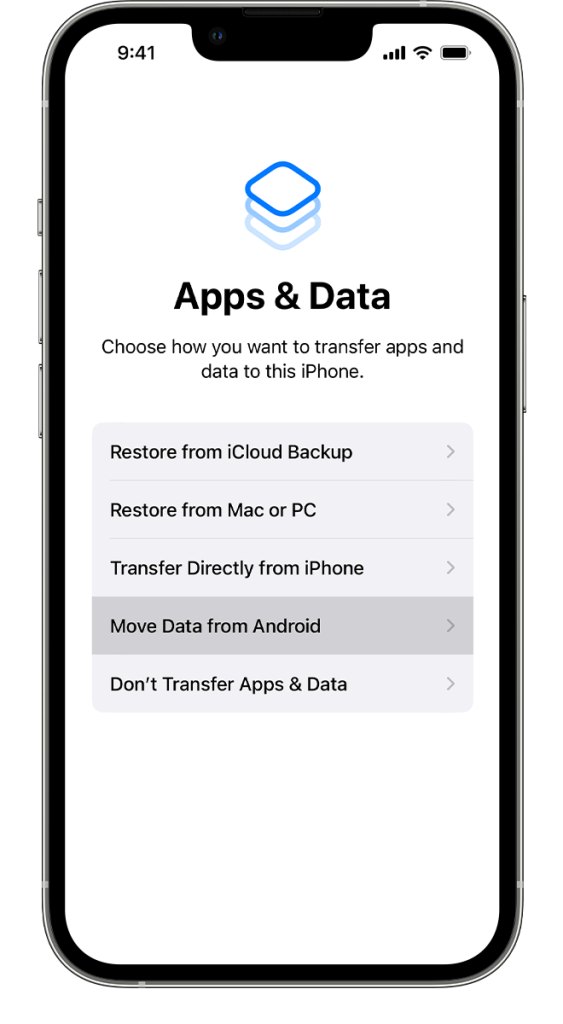
- Follow the initial setup prompts until you reach the “Apps & Data” screen.
Step 3: Select “Move Data from Android”:
- On your iPhone, select “Move Data from Android” from the options presented on the “Apps & Data” screen.
Step 4: Begin the transfer process:
- On your Android device, open the “Move to iOS” app you downloaded earlier.
- Read and accept the terms and conditions.
- Tap “Next” in the top-right corner of the “Find Your Code” screen.
Step 5: Find and enter the code:
- On your iPhone, tap “Continue” on the “Move from Android” screen, and you will receive a ten-digit or six-digit code.
- Enter the code on your Android device.
Step 6: Connect the devices:
- After entering the code, the two devices should establish a connection.
- Once the connection is established, you will see a “Transfer Data” screen on your Android device.
Step 7: Select data to transfer:
- On your Android device, you can choose the data you want to transfer to your iPhone. This can include contacts, message history, photos and videos, web bookmarks, mail accounts, and calendars.
- Select the content you wish to transfer and tap “Next.”
Step 8: Wait for the transfer to complete:
- The data transfer process may take some time, depending on the amount of data being transferred. Keep both devices connected and wait for the process to complete.
Step 9: Set up your iPhone:
- Once the transfer is complete, your iPhone will automatically organize the transferred data.
- Complete the remaining setup steps, including setting up Face ID or Touch ID, creating or logging in to your Apple ID, and customizing your settings.
Step 10: Install apps:
- The transfer process will not transfer your Android apps to your iPhone, but it will provide a list of suggested iOS apps similar to the ones you had on Android. You can choose to download and install these apps from the App Store.
Step 11: Check and update your apps:
- After installing your desired apps, open the App Store, go to “Updates,” and check for any updates for the newly installed apps.
Congratulations! You have successfully moved from Android to iPhone. You should now have all your important data and settings transferred to your new iPhone, making the transition as smooth as possible. Remember to check if everything transferred correctly and make any necessary adjustments before fully settling into your new iPhone.
